Clock Q&A
Frequently Asked Clock Questions |
|
|
Located in Frankenmuth, Michigan, Frankenmuth Clock Company is the largest full-service clock store and repair shop in the American Midwest. We offer a wide variety of clock replacement parts online and in-store for your convenience. We also employ a full team of experienced clock repair specialists to help you repair your clocks and answer any questions you may have. To learn more about our repair services, click here. To better serve you and help you fix your clock in the convenience of your home, we’ve listed some of the top questions we receive, with our answers below. |
|
Common Questions and Answers: How to Repair Your Clock |
|
No. 1 "My 5 Year old clock has stopped chiming or is not chiming correctly - how come??"If your clock has stopped chiming after 5 years, or has stopped chiming correctly, chances are the problem is a lack of, or improper, maintenance. Most manufacturers of clocks recommend 'oiling' a clock every year. Though this is a very good practice, usually if done correctly, a clock can go 2 to 3 years between 'oiling' without any problems. When whale oil used for clocks was banned in 1980, an alternative petroleum oil was developed. Petroleum oil works very well on your clocks but unlike whale oil, it evaporates over time. After 3 years, residue from the oil and trapped dust collected from the air is left behind, which wears down the clock's pivots and its bearing surfaces. The clock often stops functioning properly due to this lack of lubrication or from the worn parts. See the instructional guide below for tips on how to rebush and repair worn pivot holes in your clock.
|
|
No. 2 “How do I oil and maintain my clock?"Oiling your clock is integral to proper clock maintenance. Though some manufactures will recommend you oil your clock once every year, most clocks generally require a good oiling at least once every 2 to 3 years to ensure proper functioning and optimal longevity of the product. Make sure that you use only a modest amount of oil when oiling your clock – proper maintenance only requires a small amount of oil, and too much can actually harm the clock. See the below instructions for oiling your clock at home.
|
|
No. 3 "My clock reads 6 o'clock but strikes 8 o'clock-how do I fix it??"When setting or resetting your clock to the proper time, sometimes you can mistakenly catch the shorter hour hand instead of solely the minute hand, and move it to a different hour. The hour hand is only pressed on and can be moved quite easily. To repair and troubleshoot this problem, simply move the minute hand up to the hour and count the number of times the clock strikes. Then, move the shorter hour hand to that number. If the hour hand become loose, simply push it towards the dial to retighten it up. Once finished, reset the clock to the correct time with the minute hand (the longer hand).
|
|
No. 4 "My pendulum clock keeps gaining time-how do I regulate it??"You can regulate the time on your clock by shifting the pendulum bob up or down on the pendulum rod. Clocks with a metal pendulum have a nut located on the bottom, which you gently turn to the right to speed up the clock and to the left to slow down the clock. Be cautious when turning the nut, as just a slight movement will have a substantial affect on the time. On grandfather clocks, one complete turn of the nut amounts to 30 seconds per day one way or the other. |
|
No. 5 "How do I adjust the time (speed) on my mantle clock?"The time and speed on your mantel clock is quite simple to adjust – all you need is a small eyeglass screw driver! Using the screw driver, turn the adjustment screw clockwise to the clock down, and counter-clockwise to speed the clock up. View the below instructional diagram which illustrates where to find the time adjusting screw on your clock.  |
|
No. 6 "My Grandfather Clock weights are dropping at different rates-why??"If only the center weight is dropping it is likely attributed to one of the following factors:
If the left weight is not dropping, it is because the striking of the hour is not operating and would require servicing to correct. Clocks which have the added feature of AUTOMATIC NIGHTTIME SHUTOFF will normally experience the center weight dropping faster than the left and right weights and is normal when this feature is used. |
|
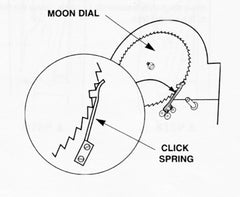
No. 7 "How do I set the moon dial on my Grandfather Clock?"If your clock has a moving moon dial feature, these instructions will help you set it. To set the moon dial, apply slight pressure with your fingers to the front of the moon dial. Rotate the moon dial clockwise until the moon is directly below #15. Using an almanac or calendar, determine the date of the last full moon. Count the number of days past the last full moon. Turn the moon dial clockwise one click for every day past the full moon. The moon dial is now set and will indicate the proper moon phases as long as the clock operates continuously. If the clock stops for more that 24 hours, the moon dial will also stop, and must be reset when the clock is started again. If the moon dial will not rotate: As you face the clock, remove the top side panel, open the side door, or remove the back access panel. Look at the back side of the dial and locate the click spring. Put your finger at the tip of the click spring. Pull the click spring approximately 1/2" back away from the saw tooth moon dial and then release. The click spring and dial should snap into proper alignment. If the click spring is in its proper location and you still feel resistance when trying to advance the moon dial DO NOT FORCE IT. If the moon dial still cannot be easily advanced, this indicates that the gears that automatically advance the moon dial are engaged. To correct this, rotate the minute hand backwards three hours. |
|
 |
 |
|
No. 8 "Can I move my Grandfather Clock to paint behind it or put in new carpeting??"Yes, it is safe to move your grandfather clock to perform maintenance on your home in the space around the clock. The below steps offer rough guideline to help you move your grandfather clock safely:
|
|
No. 9 "How do you pack up a grandfather clock?”Please note that our below directions for packing a grandfather clock are only to be used as a guideline. Every clock is different, so it is always best to have an experienced clock repair specialist pack up the clock if you will be transporting it outside the home. Guidelines for packing up your grandfather clock:
For more information, Howard Miller offers a selection of instructional videos that illustrate how to set-up a grandfather clock, and more. When packing up your clock, you can refer to the instruction for setting-up a grandfather clock, and follow the process in reverse. To view the selection of videos, click here. |
|
No. 10 "My pendulum clock stops after I put the pendulum on"If your pendulum clock stops after installing the pendulum, the problem could be a simple alignment issue. The below instructions illustrate and describe how to set up key wound pendulum strike clocks and chime clocks. Read through all instructions thoroughly before proceeding. Follow the instructions carefully. If this does not resolve the problem, please feel free to contact us at info@frankenmuthclock.com and we will do our best top provide you with guidance. 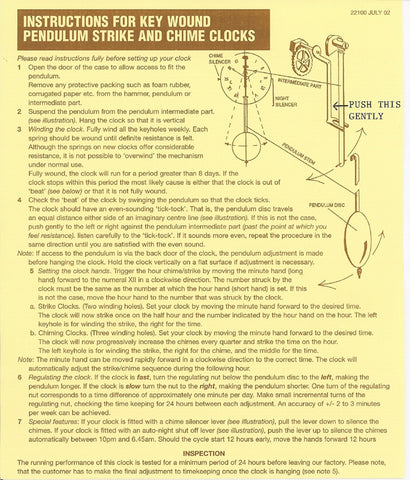 |
|
No. 11 "What should I do if my clock is running slow?"If your clock is running slow, it may need to be adjusted.
|
|
No. 12 "How can I tell if my clock needs to be oiled?"Clocks typically need oiling every 3-5 years. Signs that your clock may need oiling include unusual noises, a noticeable change in the clock’s timekeeping accuracy, or visible dryness in the movement's gears. If unsure, have a professional inspect your clock. |
|
No. 13 "Why does my clock stop and start intermittently?"Intermittent stopping can be due to an uneven surface, dirt or dust in the movement, or worn-out parts. Ensure your clock is on a stable, level surface. If the issue persists, it may need cleaning or repair by a clock specialist. |
|
No. 14 "How do I fix a clock that is chiming the wrong number of times?"To correct a clock that is chiming incorrectly, synchronize the chimes with the time. Move the minute hand to the hour and count the chimes. If they are incorrect, move the hour hand to match them. Then, adjust the minute hand to the correct time, allowing it to chime at each quarter-hour. |
|
No. 15 "What causes my clock to make a loud ticking noise?"A loud ticking noise may indicate that the clock is not level or that the movement needs lubrication. Ensure the clock is on a stable, level surface. If the noise continues, have the movement inspected and oiled by a professional. |
|
No. 16 "How do I replace the pendulum on my clock?"To replace the pendulum, gently remove the old one by lifting it off the hook. Attach the new pendulum by hooking it onto the suspension spring or leader. Ensure it is securely in place and swings freely. Follow the manufacturer’s instructions specific to your clock model. |
|
No. 17 "Why is my clock striking at the wrong time?"If your clock is striking at the wrong time, it may need to be reset. Move the minute hand to the 12 o’clock position and let it chime. Adjust the hour hand to match the number of chimes. Then set the correct time by moving the minute hand, pausing at each quarter-hour to let it chime. |
|
No. 18 "How do I clean the exterior of my clock without damaging it?"To clean your clock's exterior, use a soft, lint-free cloth slightly dampened with water or a gentle wood cleaner. Avoid harsh chemicals and excessive moisture. For intricate details, use a soft brush. Regular dusting will help maintain its appearance. |
|
No. 19 "What should I do if my clock's hands are loose?"If the hands on your clock are loose, carefully remove the front glass (if applicable) and gently tighten the center nut holding the hands. Be cautious not to over-tighten, as this can damage the clock. If you’re unsure, seek help from a clock repair professional. |
|
No. 20 "How can I level my clock if it’s not sitting evenly?"To level your clock, use adjustable feet if available, or place shims under the base until it is stable and level. Use a spirit level to ensure accuracy. A level clock ensures proper timekeeping and chiming. |
|
No. 21 "Why is my clock losing time during the day?"If your clock is losing time, it might need adjustment. Check the pendulum length and adjust if necessary. Ensure the clock is level and not exposed to extreme temperatures or humidity, which can affect its accuracy. Regular maintenance can help prevent this issue. |
|
No. 22 "What is the best way to transport my clock safely?"To transport your clock safely, remove any pendulums or weights and secure the movement. Wrap the clock in protective padding and place it in a sturdy box. Ensure it is well-cushioned to prevent movement during transport. Label the box as "fragile" and handle it with care. |
|
No. 23 "How do I set the calendar feature on my clock?"To set the calendar, refer to the manufacturer’s instructions, as this can vary by model. Generally, advance the time until the correct date is displayed. Some clocks have a separate dial or button for setting the calendar. Follow specific guidelines for your clock model. |
|
|
If you are still having problems fixing your clock, you can learn more about Frankenmuth Clock Company’s clock repair services, or contact us at info@frankenmuthclock.com. |
|


Last Update: January 30th, 2024


